
Published
•
Updated
How to migrate from Ninja Forms to Gravity Forms without rebuilding your forms
Move your Ninja Forms forms into Gravity Forms with their fields, conditional logic, and notifications using GravityMigrate, then bring your submissions across with GravityImport.

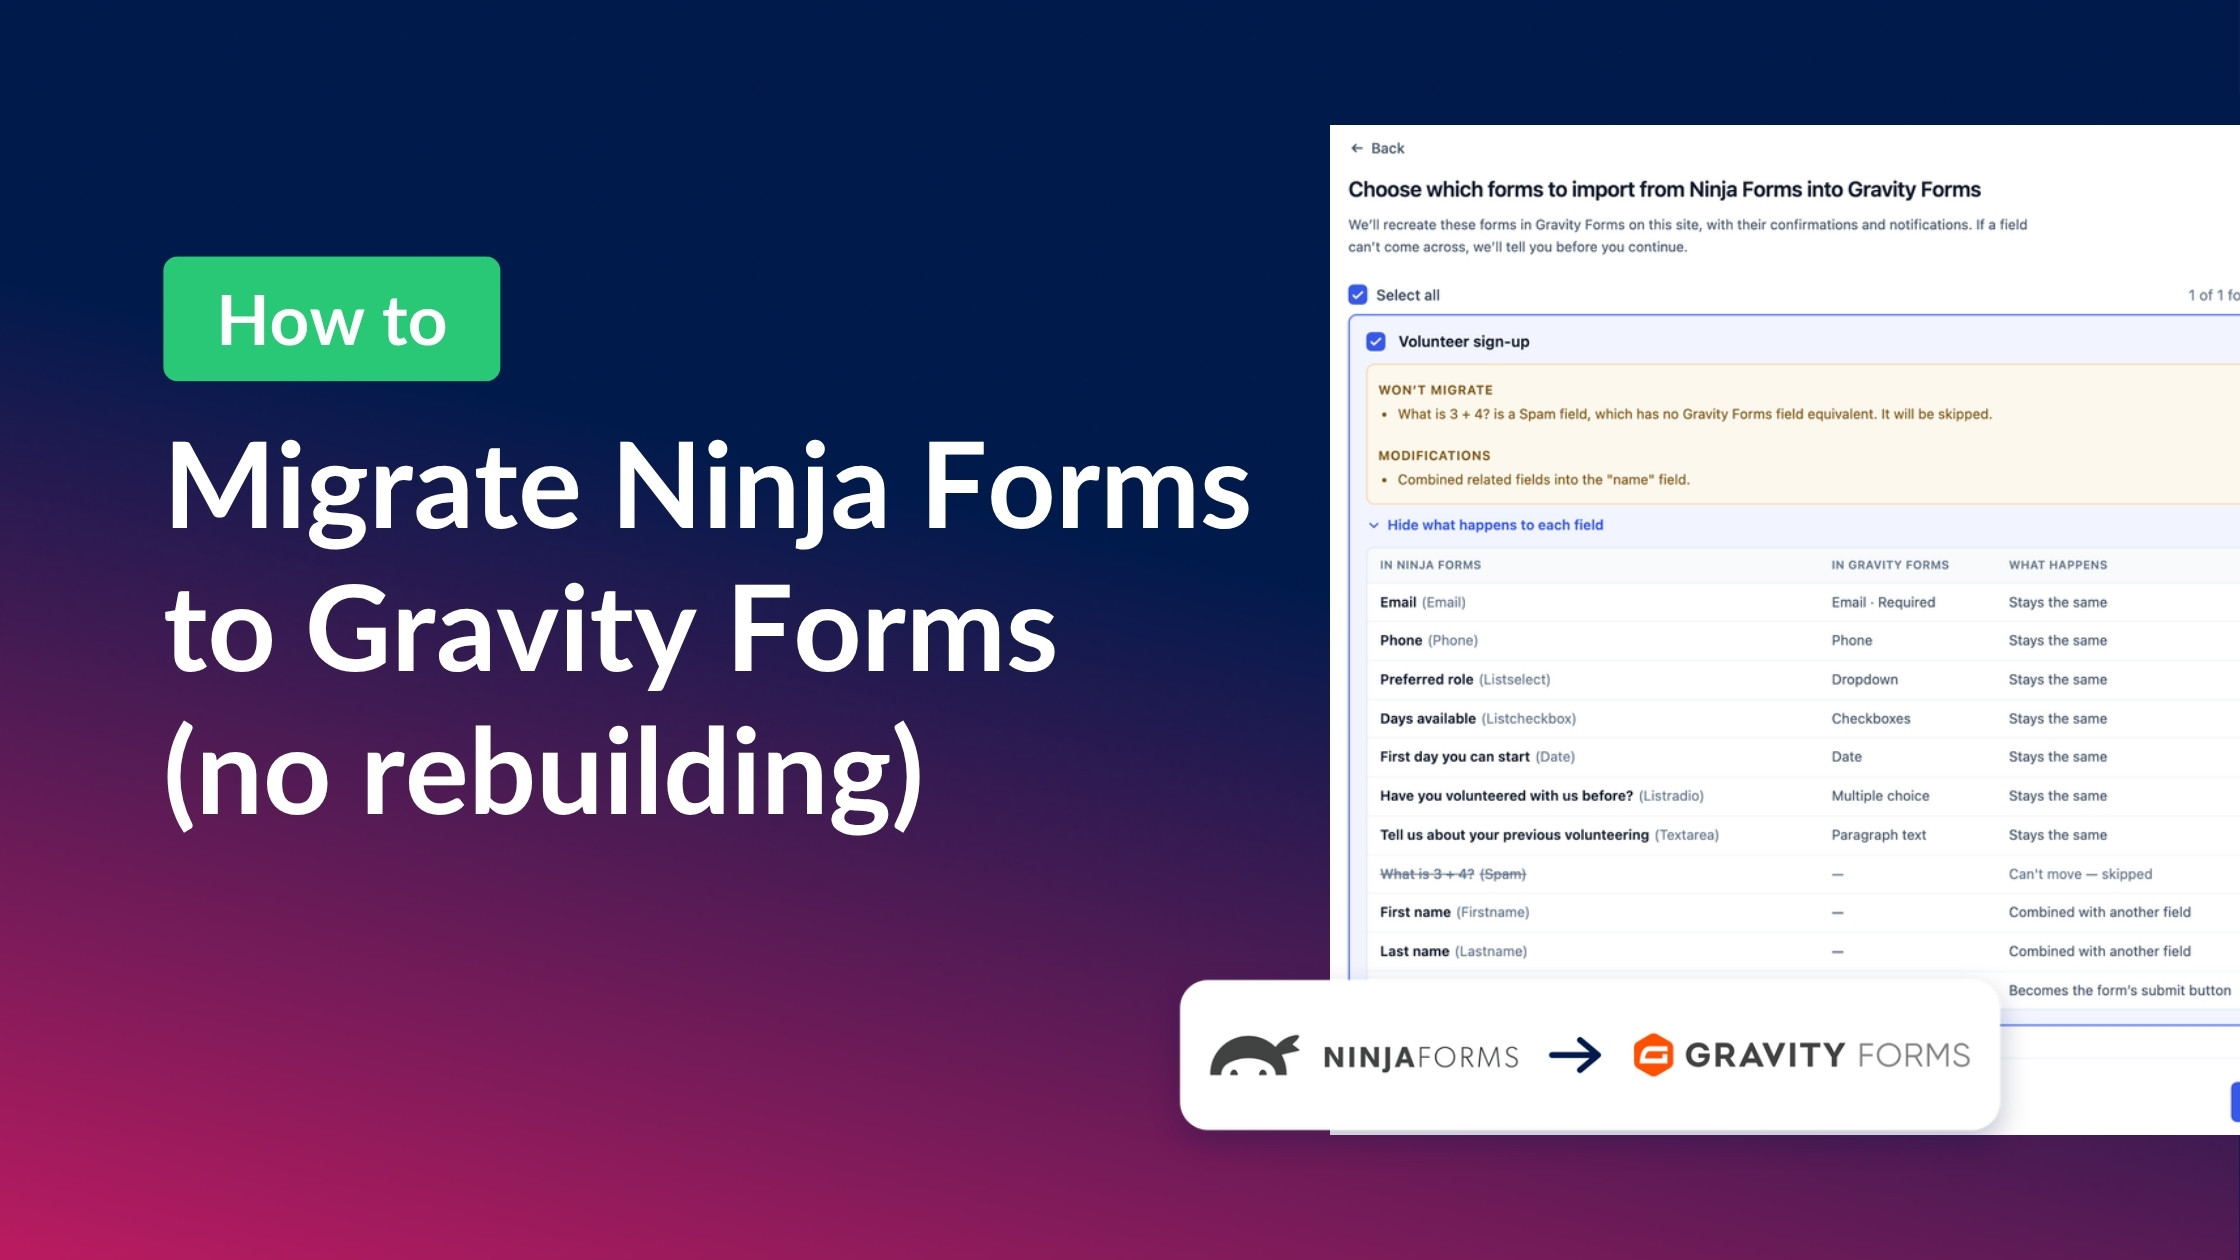
Moving from Ninja Forms to Gravity Forms used to mean rebuilding every form by hand, field by field, and then importing your old submissions from a spreadsheet. On a site with a dozen forms, that’s a lot of retyping.
GravityMigrate now reads your Ninja Forms forms and recreates them in Gravity Forms with their fields, conditional logic, and notifications, and tells you what changed along the way. In this guide, I’ll show you how to migrate Ninja Forms to Gravity Forms in two parts: the forms first, then the submissions. Let’s dive in!
What you’ll need
- Gravity Forms – the form plugin you’re moving to. GravityMigrate needs it active for every migration.
- GravityMigrate – reads your Ninja Forms forms and recreates them in Gravity Forms.
- Ninja Forms, still active on the same site – GravityMigrate reads the forms straight from it.
- GravityImport (optional) – brings your old submissions across from a CSV file.
Why move from Ninja Forms to Gravity Forms?
Ninja Forms is a capable plugin, and its free core covers a lot of sites. The case for Gravity Forms is everything built around it: official add-ons for payments, user registration, and CRMs, third-party tools like Gravity Flow for approval workflows, and GravityKit’s add-ons for displaying, editing, and charting your entries on the front end.
If you’re still weighing Ninja Forms vs Gravity Forms, our Gravity Forms vs Ninja Forms comparison covers the differences in detail. If you’ve decided, here’s how to move.
Step 1: Install GravityMigrate on the site with your Ninja Forms forms
GravityMigrate reads your forms directly from Ninja Forms, so you don’t need to export anything first. That also means it has to run on the site where your Ninja Forms forms live.
Download GravityMigrate from your GravityKit account, then upload and activate it like any other plugin (here’s how). Before you move on, check that Gravity Forms and Ninja Forms are both active on the same site.
Step 2: Migrate your Ninja Forms forms into Gravity Forms
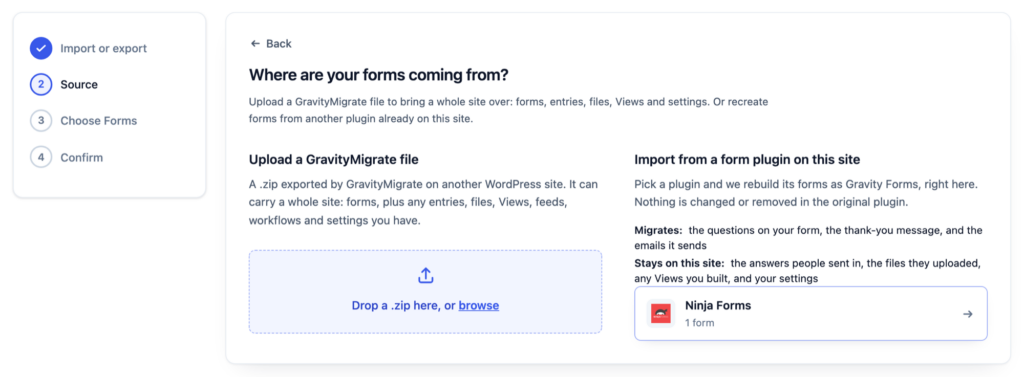
In your WordPress dashboard, hover over GravityKit and click GravityMigrate. The wizard first asks which direction you’re going. Click Import into Gravity Forms.
On the Source step, the right-hand column lists every form plugin on your site and how many forms each one holds. Click Ninja Forms.
Step 3: Pick your forms and check the report
The Choose Forms step shows a card for each of your Ninja Forms forms. Tick the ones you want to move to Gravity Forms.
Every form plugin has its own field types and settings, so not every part of a Ninja Forms form has an exact match in Gravity Forms. That’s why, before anything is written, each card tells you what’s going to happen. A card can carry up to three lists, and each one only appears when it has something to say:
- Won’t migrate – fields with no Gravity Forms counterpart. The rest of the form still migrates.
- Modifications – fields that come across but work a little differently in Gravity Forms. For example, separate first and last name fields are combined into one Name field.
- Before you use the form – setup you’ll need to do in Gravity Forms before the form goes live, such as entering your CAPTCHA keys.
For the full picture, click Show what happens to each field. The table has one row per field: its name in Ninja Forms, what it becomes in Gravity Forms, and whether it stays the same, changes shape, or is left out.

Step 4: Run the migration
The Confirm step lists the forms you picked and where they’re coming from. Click the import button, which shows how many forms you picked (for example, Import 1 form).
When it’s done, the Done step names each new form and links straight to it in Gravity Forms. Your success message and email actions come across with every form, as its confirmation and notifications. If part of either couldn’t be rebuilt, the Done step lists it under that form. Your Ninja Forms forms stay exactly where they were, so you can compare old and new side by side.

What changes when a Ninja Forms form moves to Gravity Forms
Most of a Ninja Forms form maps straight across. Here’s what to expect:
- Fields – text, email, phone, address, date, number, dropdown, checkbox, radio, file upload, signature, repeater, and product fields all come across. Separate first name and last name fields are combined into one Gravity Forms Name field, and a credit card field arrives as one Gravity Forms credit card field.
- Logic and messages – conditional logic comes with the form. Your success message becomes a Gravity Forms confirmation, redirects become redirect confirmations, and email actions become notifications. Merge tags in those messages are translated wherever Gravity Forms has an equivalent, and the report names any that aren’t.
- Spam protection – reCAPTCHA, hCaptcha, and Turnstile fields come across, but their keys live in Ninja Forms’ settings, so you’ll need to add your CAPTCHA keys in Gravity Forms’ settings. Ninja Forms’ anti-spam question field stays behind, because Gravity Forms handles spam protection in each form’s settings.
Pro tipThe Ninja Forms reference page lists every Ninja Forms field type and merge tag, and what happens to each one when it moves to Gravity Forms.
Step 5: Export your Ninja Forms submissions and import them with GravityImport
GravityMigrate moves the form. Your submissions stay in Ninja Forms until you export them, and bringing them across needs GravityImport, which imports the CSV file into the form you just created.
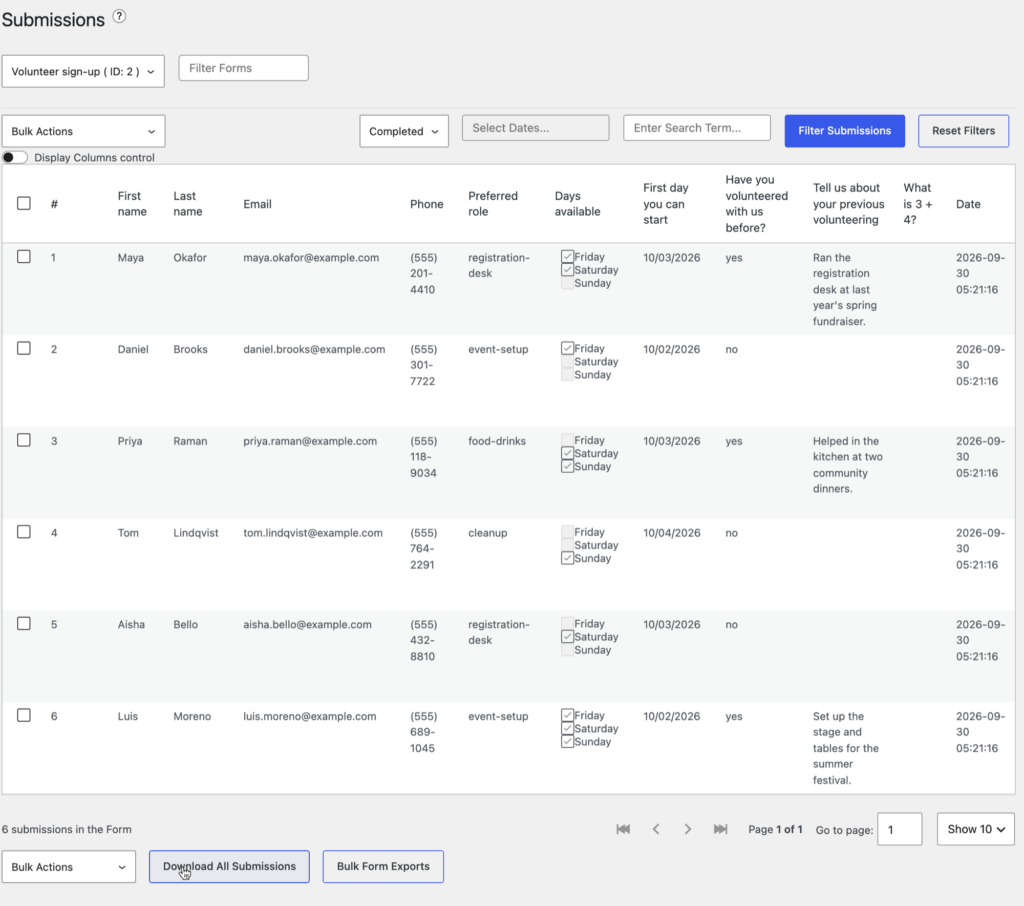
First, export the submissions from Ninja Forms:
- Hover over Ninja Forms and click Submissions.
- Pick your form from the Select a Form dropdown.
- Click Download All Submissions to save them as a CSV file. To export only some, tick them, then choose Export from the Bulk Actions dropdown.
Then import them with GravityImport:
- Install and activate GravityImport.
- Hover over Forms, click Import/Export, and open the Import Entries tab. Upload your CSV file.
- When GravityImport asks where to import the entries, click An Existing Form and pick the form GravityMigrate just created.
- Map each column in the CSV to a field on that form. Map First name and Last name to the First and Last parts of the Name field, and Date Submitted to Entry Date so your entries keep their original dates. Untick any columns you don’t need, such as the “#” submission number Ninja Forms adds.
- Review the options on the Configure step, then click Continue With Import.

Pro tipIf GravityImport marks the Date Submitted column as “Date Not Recognized,” click the gear icon next to it, choose MM/DD/YYYY from the list, and click Update. The dates are then read correctly.
Our guide to importing entries into Gravity Forms covers every import option in detail.
Step 6: Swap the form on your pages and retire Ninja Forms
Last, point your pages at the new forms. Edit each page that shows a Ninja Forms form, remove its block or shortcode, and add the Gravity Forms Form block in its place. Then pick your new form in the block settings. Our guide to embedding a Gravity Forms form covers the other ways to add it.
Submit a test entry to make sure your notifications arrive. Once your submissions are safely across, you can deactivate Ninja Forms.
Pro tipMoving to a new site as well? Run the migration on the old site first, while Ninja Forms is still there to read from. Then move your whole Gravity Forms setup, forms and entries included, to the new site with a GravityMigrate file. Read Getting started with GravityMigrate for the full walkthrough.
Frequently asked questions
Yes. GravityMigrate reads each Ninja Forms form on your site and recreates it in Gravity Forms with its fields, conditional logic, success message, and email notifications, then shows you anything it had to change. The .nff file from Ninja Forms’ own Import / Export screen won’t open in Gravity Forms, so GravityMigrate reads the forms directly, which means Ninja Forms needs to be active on the same site. rtCamp also publishes a free importer for .nff files on GitHub, built for its own client projects. We haven’t tested it, so we recommend GravityMigrate, which also shows you what changed on the way.
Yes, with GravityImport, as a second step after the forms. In WordPress, go to Ninja Forms, then Submissions, pick the form, and click Download All Submissions to save them as a CSV (Ninja Forms’ guide). GravityImport then maps each column to a field on your new form and brings the rows in as Gravity Forms entries.
Fields, conditional logic, the success message, redirects, and email notifications come across, and GravityMigrate lists anything it changed before you run the migration. A few things need you afterward: CAPTCHA fields need your keys entered in Gravity Forms, and Ninja Forms’ anti-spam question stays behind because Gravity Forms handles spam in its form settings. The form also takes on Gravity Forms’ styling, so any custom CSS you wrote for your Ninja Forms forms will need updating.
It depends on what your forms need to do. Ninja Forms has a free core plugin on WordPress.org with paid add-ons, while Gravity Forms has no free version. In return, Gravity Forms has a large ecosystem of official and third-party add-ons, from payment gateways and Gravity Flow workflows to GravityView for displaying entries on the front end. If the free plugin already covers what your forms do, there’s no need to switch.
Ready to switch?
GravityMigrate turns a form-by-form rebuild into one guided migration, and the report tells you what changed before anything is written. It also works with WPForms, Formidable Forms, Contact Form 7, Fluent Forms, Forminator, and WS Form, if you have forms in more than one plugin.
Get GravityMigrate, or try the GravityMigrate demo to see it before you install anything.

Get better at Gravity Forms, one email a week
New GravityKit releases, practical Gravity Forms tutorials, and subscriber-only discounts. One short email every week, unsubscribe anytime.
More articles

Launch Log: AI-built boards, inline Entry Tags editing, and Views kept on uninstall
This week: AI-built GravityBoard boards, inline Entry Tags editing in Views, Views kept when GravityView is deleted, and security fixes we recommend installing.
How to migrate from WPForms to Gravity Forms without rebuilding your forms
Move your WPForms forms into Gravity Forms with GravityMigrate, keeping their fields, conditional logic, confirmations, and notifications. Then bring your entries across with GravityImport.

Launch Log: Search Everything matches what fields show, steadier map searches, and security updates
GravityView’s Search Everything now matches the names fields display, and GravityView, Maps, GravityCalendar, and Dynamic Lookup get important security fixes.